Posts

Showing posts with the label vfx

[vfx] work notes 10

if there is a 180 degree camera pan shot, and there is a clear cut point, can cheat different light rigs post-move means animation takes the plate, and places it in a certain place to mix with the cg anim does matchmove clean up and polish, they are different tasks for houdini single frame files in shot, hold end frame and change to single file for aerial huge wide shots with mountains, far clipping plane makes a difference, 1000 will cut the environment off, 100000000 the whole environment will fit search level, shot level and any level is different, any level is the whole show library pre-comp grabs anim qc in the nuke tree for comparison in show dailies present the question if motion blur too blurry and long, try half shutter drag utility CTN into hypershade hair render problem, can update hair attributes itself to fix, like, width , strand, and length optimize max tessellation subdivisions, and max tessellation length redshift object properties controls overrides for optimization h...

[vfx] work notes 8

elements body costume body peach fuzz costume peach fuzz facial peach fuzz shot model (muscle) facial shot model  hair reduce peach fuzz spec for less noise can lower peach fuzz shader specular primary amount change from 1 to 0.3 remove eye highlight use light link to remove certain light on eyeball geo notes many repeating windows, should randomize them smoke needs lighting direction big building need small interior lights, small neon interactive lights from surrounding buildings to look big chair cushion needs cfx pros of working from home can work on computer and attend zoom meetings at the same time in the studio, need to book the theatre for daily sessions, and also can't work on the computer at the same time sups can attend meetings with many departments in one day, they don't need to book any theatres change center of mass  fn + delete is insert vray render view zoom in render view > ctrl + click > zoom into render light rig use locator to write info and categoriz...

[vfx] work notes 7

deferred pipeline deferred pipeline can swap between proxy and full geo namespace editor > delete namespace shader is assigned on the full geo model with certain namespace proxy geo (preview) > swapper > full geo (alembic) > namespace editor > load material set sss noise vray > DMC sampler > use local subdivs material sssSubdivs 256 transformation shots anim > fx > cfx > lgt cfx will use a certain animation version, it will be shown in email or different formats if there is new anim, but no new cfx, need to roll back anim to match current cfx mirror reflection render domelight visibleInReflections should be off filters "no hair" filter is important, because hair renders long add plate to render view in vray frame buffer, bottom left, set background image as plate can toggle foreground button, to compare render to plate show light texture in viewport maya vray texture > show in viewport > texture only vray RT can be used as IPR rendering pre...

[vfx] FX spell elements

  Beam spell duel FX elements Muzzle flash Center ball (at duel contact point) Sparks (at duel contact point) (small pieces with more detail) Droplets (at duel contact point) (big pieces) Plasma surrounding center ball (causing heatwave) The beam itself Black smoke coming off the beam Nucleus  (at the head of the beam) Spell effecting BG environment light interactive Spell effecting atmosphere fog light interactive Spell force effecting the ground causing physical cracks Apparate FX elements The Apparate spell itself The residue of the Apparate spell left in the air, like dust The residue of the Apparate spell left on the ground, like debris Shockwave that effects surroundings

[vfx] work notes 6

FG and BG exposure BG explosion behind FG character, if BG explosion is exposed correctly with detail and mid tones, the FG character in front would be a black silhouette. If FG character in front is exposed with detail and mid tones, the BG explosion behind would be blown out, all white. Facial interactive light from flashing spell using 2D comp treatment When pulling out spell caused light interactive color on character's face, you need to pull out the specs on the face as well. 2.5 D comp fix for flickering bricks using camera projection Bricks are flickering in the render, roto and frame hold one frame of the flickering brick, use 2.5D (camera / scanline render) to paste back this one frame non flicker brick to cover over the flickering part. Atomic is empty This usually happens when you open someone's else scene, and the atomic data is not copied over. To fix it, from Atomic directory, copy the .atom file for the corresponding scene to your directory, the name of the atom ...

[vfx] work notes 5

[farm] [farm] check render farm for irregular renders, long renders, or renders taking a lot of memory, please flag it to the team [farm] can add and edit filters for different tabs and keywords [houdini redshift] [houdini redshift] turn off visibility of all the lights, disable dome, raise light itself samples, helps with shadow noise [houdini redshift] for the shadow samples, raise the minimum samples, like min 16, min 32, min 64 [houdini redshift] there is a bug, when rendering IPR, it turns off motion blur, need to remember to enable it back [maya] [maya] "load material set" command in shot description, is the same as finding the material in organic manually, don't double do it [maya] the "main_mtl" naming material, is usually the main material to assign to atomic (there might be only one material that is needed to be assigned) [maya] atomic test layer needs to duplicate functional layer, with all the settings imported, don't use empty layer to test [may...

[vfx] houdini redshift

beauty : storage format : scanline / full multi layered exr file deep : no multi layer exr file main rop > unlock channel first > then delete channel to customize if there is no available camera format in main rop, can change the format in the camera itself, control > view tab > change format shift drag for region render proxy layout uses less memory than normal layout (redshift proxies, are redshift renderer only proxy, that use less memory) inside the light rig, use null node to group lights, null node is like a group node, also add network box to group lights redshift sss flicker solution : a) sampling : point based b) quality : high update houdini template, delete two nodes, the template node, and the namespace node, need to delete both, refresh ab, then get (the namespace node is what is showing up in ab)

[vfx] work notes 3

Flicker Expression If you want to generate a curve with random values between 2 and 8 with a (low) frequency of 1 peak every 5 frames this is the formula: (random(1,frame*0.2)*6)+2 (random(seed,frame*frequency)*amplitude)+valueOffset If you want a curve containing random values between 0 and 1. (random(1,frame*1)*1)+0 simplified version : random(1,frame) Break it up rooftop bricks :  break it up, some big, some small, less straight line, slight color variation fx expanding spell :  don't expand like a circle, break it up, more starfish like, more organic fx spell trail dissipation :  use wind to break up the straight line trail walls :  add dirt, add moss, don't be too clean heat haze :  break it up, some small, some big, some have some holes Framehold alembic how to framehold anim/cfx crowd alembic file? asset objects > load options tab > frame parameter default it $FF (frame number by default) clamp it by doing : clamp($FF, 1120, 1251) ie: clamp(val, min...

[vfx] houdini

cross paste UI, is a pasting list (can choose from list) lights : top left bar, check object display (turn on lights) layout : forced display override > full geometry (show layout full geo, it is usually wireframe) bottom right corner can toggle manual or automatic mode (manual mode for heavy scenes) transform world space, right click > align handle > world below the chin is very dark like a beard, need to increase diffuse limit (increase bounce) bounce, diffuse limit 1-3 is good, 0 is no bounce, over 3 like 10 is noisy and not good camera focuses on object, is space + g in houdini ( is f in maya) houdini diffuse limit 1 is very noisy, so all the crowd default is diffuse limit 0 noise, 9x9 is hi, can solve it (still need to check where noise is coming from) 5x5 is mid, 1x1 is super fast render add deep, ROP > images > preset : geometry (this is deep) none (this is no deep) use file node to load bgeo

[vfx] departments

lookdev and texture check assetdev in dmx, banners texture isomask is there dmp integration / mattepaint castle and mountain connection point, paint in some moss and dirt to make the connection line smoother paint icicles and snow connection point replace ground patchy geo with dark lines, with nice snow painting and painted footsteps if there are hand drawn lines, like bricks and tiles on the ground, supervisor needs to review it's perspective, the perspective needs to match with the cg render wireframe fx spells need the spell itself and a shockwave pass firework fx shouldn't be all see-through when fading, the smoke should be thick in some parts and block the back buildings here and there lighting gobo is directional light + cutout planes larger light for more falloff background need light decoration, candles, lamps, or off screen light to be more cinematic putting texture in light might not create gobo, will need IES in the light map, or use actual geo gobo always name the ...

[vfx] linux

search apps linux desktop empty place > press mouse > start typing to search for apps ksysguard (system monitor) windows 10 : task manager linux : ksysguard system monitor (these two can both check running programs) clean network user / clean disk / delete local trash this is not local user, this is network user cd /dd/shows/VERM/user/work.chiang/ find -type f -name '*.vrimg' -delete ls -a (list all files) cd ~/.local/share/Trash/ (needs to be capital T) rm -rf ~/.local/share/Trash/* konqueror right click > folder properties go go verm is cd /dd/shows/VERM linux apps and commands type rgr - log into other's machine to see their screen type submit_ticket - for pipeline ticket type htop - show cpu usage type nvidia-settings - for dual screen configuration type diskman - disk management webpages grafana - show render farm usage percentage diskard - show disk usage percentage

[vfx] maya and houdini - flicker and motion blur notes

maya vray gobo flicker artifact vray if secondary bounce is brute force , will have black artifacts in dark areas so need to change secondary bounce to light cache to fix black bucket artifact so need to change min subdiv from 1 to 4 or 8 to fix black bucket artifact the black swimming artifacts are square buckets error maya vray snow flicker color mapping subpixel mapping - check clamp output - check clamp level 20 clamp max ray intensity - check max ray intensity 10 maya high quality fix flicker vray high quality is min 4 max 32 threshold 0.05 vray ultra high quality, if still flickers, is min 8 max 128 threshold 0.01 houdini banners hot spot flicker render rop > limits > color limit change from 10 to 5 for less flicker houdini motion blur baked (special occasion) geo time samples 1 render > sampling > velocity blur on (on the group) no time blend node (inside the group) houdini motion blur using timeblend geo time samples 2 render > sampling > no velocity blur (on...

[vfx] work notes 2

Use actual shot cam to review and iterate look dev and environment updates. Brick should break like brick, glass should break like glass, wood should break like wood. If there is a neutral grade on the plate, there needs to be a neutral grade on the cg spheres. Send email to team for shot grouping, for other department clarification, and to let others post problems. Crowd needs to have offset for each shot, not keep on looping same action for each shot. Ask how was the farm last night. Review environment and character spec map, and diffuse map, one by one. When update is broken, important way to debug is revert back to old look dev. Sometimes environment needs to be one-off, for example mountain geo, it needs to work for this angle, but it might not work for other angles. When matching plate and CG, think red, green, or blue, which side is it closer to. Goals of the week. Clothes need to drape, not have wind in them, for example coat tails shouldn't fly up by itself when the charac...

[vfx] work notes 1

Comp Use real glow node on key light where the sun hits Don’t key flare, find organic way, use sun as a circle, shoulder as a matte When shoulder blocks sun there is no flare When shoulder moves, sun peaks out and creates flare in the camera Far background always needs to be hazy, so comp needs to fix the far background elements to become hazy and atmospheric Haze is a nuke node Use lift to fix shot black level at the end of comp Match Defocus needs to match Tone needs to match Highlight exposure needs to match All objects look need to match Eye spec needs to match shot brightness When rendering half size, in footage pool, resize back to original first, then link to postage stamp in tree Frame range node first + RSMB node second, for it to not error Add camera shake - use tracking, then create matchmove Muzzle flash Use plus to merge muzzle flash light with scene light When muzzle goes off contrast is higher Muzzle glow is over exposed no detail CHR and BG dark area will be darker, bri...

Anamorphic lens vs Spherical lens

Image
Anamorphic lens lens elements are oval (鏡頭裡,玻璃片是橢圓形的) produces squeezed image wide screen aspect ratio (2.35:1 or 2.39:1) oval shaped bokeh less sharpness more distortion more lens flare Spherical lens lens elements are circular  (鏡頭裡,玻璃片是圓形的) produces uncompressed image square aspect ratio (1.33:1 or 1:85:1) circular shaped bokeh more sharpness less distortion less lens flare

16mm / 35mm / 65mm 的不同點

16mm / 35mm / 65mm 的不同點,簡單來說,是大小 16mm 底片: 寬度是 16mm / resolution 較底 / 便宜 / 業餘 / 消費者用 / 是用 16mm 的 film camera 拍的 35mm 底片 : 寬度是 35mm / resolution 較高 / 標準 / 專業 / 電影用 / 是用 35mm 的 film camera 拍的 65mm 底片 : 寬度是 65mm / resolution 超高 / IMAX 用 / 是用 65mm 的 film camera 拍的,但會用 70mm 的 film prints 來 project

Newton Thomas Sigel - lens and focal length

Image
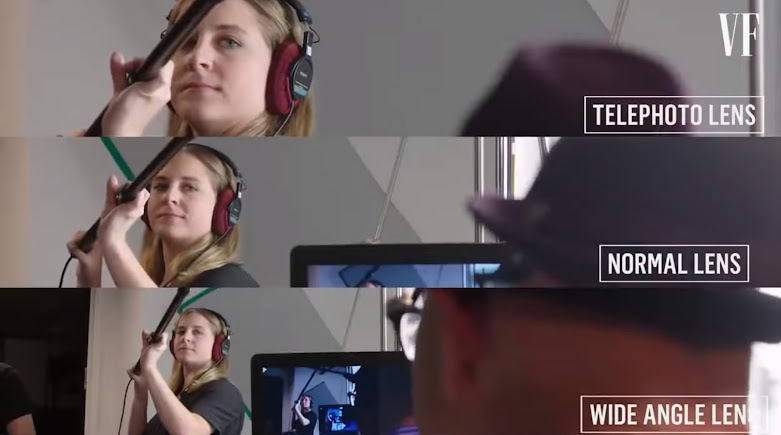
Photo courtesy of Vanity Fair and GQ Taiwan Focal Length Distance of the optical center and the receiving image plane in the camera lens It is expressed in millimetres Longer focal length : Narrow angle of view (telephoto lens) Less background Background objects "appear" bigger Background and foreground objects "appear" closer Objective Third person (alienation / confusion) Voyeuristic point of view Shorter focal length :  Wide angle of view (wide lens) More background  Background objects "appear" smaller Background and foreground objects "appear" farther Subjective Personal (intimacy) Closer to subject

VFX work notes on QC / pipeline / trace objects / HDRI

Image
Upstream needs to make QC daily for downstream, FX needs to make FX QC daily for lighting for naming transfer purpose for version check purpose for animation check purpose for split up to small group check purpose Pipeline Design need tool to check all the versions of upstream asset packages need tool to duplicate shot modules for mass production render jobs need placeholders, so production can know how much farm share is needed every night render comments are for production to assign different priority every night Overall  when in doubt, always consult  check self first, then notify upstream after update, always restart any problem, report back man power problem, report back schedule problem, report back pipeline problem, report back research and development is key to moving forward Supervisor check shots zoomed in check shots slowed down check shots with brightness up check shots with surrounding shots supervisor job is to understand upstream director supervisor job is to fi...

最近的 Nuke & Shading & Particle

Photoshop 如果有 alpha channel - [ctrl+滑鼠選取] alpha channel 圖層 - 才會選到 alpha 的正確資訊 (用 magic wand 選是不正確的) png 是 RGB, tiff 是 CMYK Nuke hotkeys : L - arrange nodes Window 檔案總管 – nuke quicktime helper 關掉 可解決 Nuke 中無法 copy 的問題 框選要改路徑的 nuke nodes / nuke > edit > node > filename > search & replace dilate / s_mattops / edge blur 解決邊的問題 Fog 不是 light 不會亮 不能用 screen 方式合成, Fog 先變 grey 再疊上去 zblur 做完之後再疊一次zblur 圖中白色清楚部份到全畫面上, because清楚部份的邊會被臨近邊的 alpha 產生 blur 給吃掉, 所以必需再疊一次上去 Light3D – normal 的圖接 normal node / color 的圖接 source node用merge (plus) 合成 Ctrl + shift 吸色 Rim的合成法 用CC 變色 加上glow 最後用 merge (plus) 合上 Particles Shading > particle render type > numeric 可查 particle 的號碼 Seed(id); 的意思是: 每一台機器產生的亂數是一樣的 Container properties – 不能直接拉大小 , 要調 size 參數, 直接拉大小 resolution 會變差 nParticle 要網路算圖, 不能用geometry cache 要用 create nCache nCache : set project的路徑 要跟 maya : set project 的路徑一樣 vector 是 xyz / float 是 小數點 Shading: 先 [RGB to luminance] bump 才能吃 out color > value ...

最近的 lighting and layout

燈光的屬性 亮度 – 攝影曝光度 brightness 柔 / 硬度 (光&影) softness Throw pattern 光 角度 (時間, 佔物體的比例) angle 直接光線 direct light 間接光線 (反彈, GI, FG) indirect light * 觀察大自然 – reference * 注意螢幕外的空間 off-screen space 作弊 角度 來源 角色陰影 (有/無, 位置) 戲劇效果 – 暗的森林角色是亮的 打光是藝術不全是科學 燈光設計的目標 讓物件清楚 (2D畫面表達3D物件) 讓物件有可信度 a) 參考真實物件 (比對/調整 b) 任何風格都必需遵守 不好的藝術家才會怪工具 (修正工具本身的錯誤, 限制, 不是自動的需要手動) 畫龍點睛 (金屬, 水, 眼睛) 連續性 (觀眾舒適的體驗 – key cut, light rig) 導引觀眾的眼睛 (到重點位置, 避掉不重要(閃光, 奇怪的影子) 觀眾不會看到打燈但會感覺到 (戲劇性, 氣氛, FU) 了解故事 - 情緒有轉變 思考高or低反差? 繽紛or暗淡 衰減方式 no decay - 地球上看到的太陽, 基本上是不衰減的 linear - no decay 和 quadratic 之間衰減方式 (製作上更多彈性) quadratic - 科學上正確的衰減方式 cubic - 戲劇性的衰減方式 (光穿過 murky waters 不太透光的水) 三點打光 key light - 主光影子方向 fill light - 黑的地方會變亮 例如:IBL HDRI 球是扮演 fill light 的角色 bounce light - 反射的光 燈的參數 亮度是:RGB number 乘 Intensity 紅光照同色系會變亮, 照相反色系會變暗 illuminates by default 不勾選 - light link 變手動 light radius 變大, 跟 area light 範圍變大ㄧ樣, 影子也變柔 throw pattern 或叫 gobo ...